15 Adult Coloring Book Mistakes (And How You Can Fix Them)
Posted by ColorIt Support on
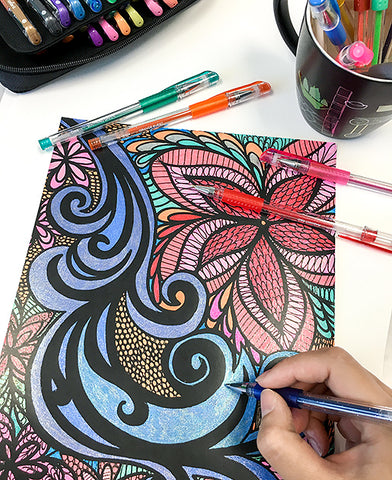
Adult coloring books are a fun and relaxing way to free your creativity.
However, like any good hobby out there, it's not uncommon to encounter a couple of stumbling blocks along your coloring journey.
Finger fatigue?
Wonky color combinations?
Broken pencils?
It's okay, we've been there--- and we're here to help you get out of the same rut.
Here are 15 of the most common mistakes that you can make when doing adult coloring books and how you can fix them:
Coloring In General
Not Planning Your Palette
Look, we're down for a Blindfolded Coloring Party every once in a while but we all know that it's always best to build a palette before you start coloring.
Not planning on a palette is one of the most common mistakes that newbie colorists make. It's pretty easy to get excited and use all the colors that you can get your hands on at the beginning. We know, we've been there...and it took a few less-than-visually-pleasing coloring pages before we finally decided to stick to a color palette.
Selecting a color palette is actually pretty easy. All you have to do is to select about 4-5 colors to work with. Limiting your choices brings out your creativity and helps you achieve a more cohesive look for your coloring pages.
Not sure which colors to pick? A bit of color theory can help. Check out the tutorial above for a quick refresher!
Take inspiration from your surroundings, your favorite photo or hey, you can even pick one from a Pinterest board. You can also check out this helpful resource on how to build a solid color palette.
Skipping The Swatch

Like planning your color palette, making a swatch of your colors is a super important step before actually creating artwork. Unfortunately, a lot of people skip this part, which results in inconsistent colors, scratchy pens and a workflow that’s all over the place.
Swatching your markers, pencils, gel pens or glitter pens can help you have a smoother workflow.
See, sometimes, the actual color of the ink can vary from the color of their caps, or there can be a slight difference in the ink’s vibrancy when they dry. That’s why when you get a new set of art materials, always swatch them first so you know which colors are best for your artwork.
Creating a swatch also helps you select the right color, especially if you’re working on a piece that takes more than one sitting to finish.
Have you tried working on a coloring page on and off, only to find yourself unable to decide which exact shade of gray you used for a particular area? Spare yourself the trouble of trial and error and just swatch your art materials. You’ll save a lot of time and effort in the process.
Using Random Copy Paper
Using the right kind of paper can make a world of difference not only when doing adult coloring books, but in making art in general. Artist-grade paper simply brings out the best in your coloring mediums.
When selecting an adult coloring book, make sure that its pages can handle a bit of stress and ink saturation. Thin pages don’t allow you to blend, build your layers or move your ink around, so never settle for less. Only pick coloring books with high-quality, artist-grade paper.
Ignoring Finger Fatigue
Finger fatigue and wrist pain is a common problem among art enthusiasts, especially to people who use colored pencils or gel pens. Some people tend to push really hard or put a lot of pressure on their fingers and wrists, causing repetitive strain on their joints. If you’re not careful, finger fatigue could lead to serious problems like carpal tunnel syndrome.
We learned that the hard way, too. Weeks of having our dominant hand wrapped up in a bandage and unable to move? Not cool, especially when you’re hankering to color a gorgeous new page.
We don’t want you to suffer the same fate, so prevent finger fatigue by practicing a light grip when coloring. Only put pressure on your strokes when you really need it, like when you’re pressure shading or burnishing with your colored pencils.
Take your time when coloring adult coloring books. Remember, it’s all about the journey. Using a light hand when coloring takes mindfulness and practice. Intentionally keep your strokes light and you’ll keep your hands and wrists healthy for a long time.
Always comparing one's work with others
Ah, comparing your work with others’ is always tough. But hey, don’t let it get to you.
Like every other skill out there, coloring takes practice. You won't become Picasso or Van Gogh in a blink of an eye. And the truth is, you don’t actually have to! All you gotta do to enjoy adult coloring is to be yourself.
Different people learn at different paces and can adapt to different styles, so just sit back, relax and enjoy the coloring journey.
Common Mistakes When Using Colored Pencils
Using colored pencils for your coloring books is a whole lot of fun, but newbies can still encounter a few these stumbling blocks:
Not Building Enough Layers
One of the most common mistakes people make when using colored pencils is not building enough layers.
Colored pencils have smaller tips compared to other mediums, so completing an artwork may take a bit more time. Some folks lose patience and stop coloring after putting on an initial layer of pigment. This results in pale and patchy colors with the paper still showing through.
How To Fix It
Thankfully, it’s easy to fix this mistake. Just take your time when using colored pencils. This coloring medium takes a bit of patience so slowly and surely build those layers until you fill the paper with enough pigment. This will help you achieve more vibrant results and will allow you to blend more smoothly if you’re using solvents.
Burnishing Way Too Soon
This mistake is the opposite of the first one. Burnishing happens when you apply the maximum amount of pigment to an area, flattening the tooth of the paper and creating this smooth, waxy surface. It’s a great technique to apply when you’re about to finish a piece, but it’s not so great when you still want to build your layers or work on your shading.
See, when you flatten the paper’s tooth, you can’t add any more pigment to that area. You’ll be unable to fix any mistakes or blend properly.
How To Fix It
Again, when working with colored pencils, slow and steady wins the race. Don’t be rash in applying your strokes. Build your layers and blend gradually. Keep the pressure on your fingers light and burnish towards the end--- when you’re completely satisfied with your work.
Using Harsh Strokes
Coloring in one, straight direction is faster but it also creates harsh-looking strokes. The lines will look stark on the paper and your blending will look unnatural.
How To Fix It
Instead of using harsh, straight strokes, try to color using small circular strokes instead. This lets you evenly distribute the pigment without creating harsh lines. You can also use other techniques like cross-hatching, going on the opposite direction of your original strokes, stippling, and the like.
Common Mistakes When Using Alcohol Markers
Having a hard time blending with alcohol markers? Don’t worry, we’re here to help you out. Here are the most common mistakes people make when using alcohol markers:
Using Too Much Ink
When you’re having too much fun with markers, you tend to apply too many layers and oversaturate the paper with ink. This makes your coloring pages appear blotchy and mottled. Your ink may also bleed through the paper.
How To Fix It
Use a light hand when laying down your strokes. Coloring from light to dark is preferable if you’re a beginner, but you can also go the opposite way if you want to avoid over-blending.
If you find yourself adding more and more layers to try to fix a shading issue, take a break from your coloring page. After a quick rest, you can look at your piece with fresh eyes. Maybe the “issue” that you’re trying to fix isn’t as bad as you initially thought it would be. And if it really does need fixing, you can pick a shade that’s perfect for the job, instead of building endless layers.
No matter how thick your paper is, alcohol markers will seep into the page, so as always, don’t forget to use a blotter page when using this medium.

Creating Streaky Areas
Streakiness happens when you lay down strokes slower than the ink dries. This also happens when you don’t put enough ink on the area.
How To Fix It
You can easily remedy this by blending while the ink is still wet.
Sometimes, streaky lines just mean that you need to add another layer of ink to make things even. Once you get the hang of producing even strokes and blending while the ink is still wet, you’ll see that the streakiness will start to disappear. You just need to practice!
Pushing Your Marker Nibs Way Too Much
Most alcohol markers have felt nibs. They can handle moderate use, but will most likely fray when you put too much pressure on them. Your markers can also get damaged when you use them on rough, toothed paper.
How To Fix It
Frayed nibs are every colorist’s nightmare. Once they’re damaged, there’s little you can do to save them. To prevent your nibs from fraying, only use your alcohol markers on smooth paper.
Markers actually don’t need a lot of pressure to produce ink, so keep your grip light and easy when using them for art.
Not Storing Your Markers Properly
Improper marker storage is actually one of the most common reasons why markers dry out or get damaged. When you store them vertically, the ink can flow unevenly down in one direction. This can either dry out the nib or overly saturate it. Markers will also dry out if you don’t cap them properly or leave them exposed.
How To Fix It
Store your markers horizontally so that the ink stays even inside the barrel. Get a marker container or travel-friendly case that allows you to store and organize them without hassle.
Make sure to cap your markers after each use.
The sun can affect the ink’s chemicals and can even change their color, so lastly, store your markers in a cool, dry place away from direct sunlight.
Common Mistakes When Using Gel Pens
Whether you’re using regular gel pens or glitter pens, you can’t deny that this medium really brings the bling to your coloring pages. Here are the most common pitfalls that gel pen enthusiasts face and how you can avoid them:
Not Testing The Gel Pens On Scratch Paper First
Some gel pens can be a bit scratchy in the beginning, especially if you haven’t used them for a while. One of the biggest mistakes people make when using gel pens is jumping the gun and using them without checking for the ink flow.
How To Fix It
Super simple fix: test your gel pens out on a piece of scrap paper before using them on your coloring page!
Dropping your gel pens
Dropped your gel pens? Tough luck. When you drop your pens, the ink inside the cartridge can get separated. Dropping can also break the caps, damage the tips and render your pens useless.
How To Fix It
Like damaged marker nibs, you, unfortunately, can’t do much once you damage your gel pens. That being said, you really have to be extra careful when using them. Use a sturdy EVA case to store your gel pens. Make sure that they lie horizontally--- not nib side up so they don’t leak.
Next, keep them in a cool dry place--- but not too cool; you don’t want your ink to freeze.
Smudging The Gel Pens
Think you can’t blend gel pens? Think again. Gel pens are actually quite spectacular when you blend them wet on wet. The problem is that folks tend to color with gel pens without a system. They just color parts randomly, which usually ends in smudged, messy lines.
How To Fix It
Color systematically. If you’re right-handed, color from left to right. If you’re a lefty, do it the opposite way. Or better yet, do your coloring pages from top to bottom. Whichever way you choose, stick with a system that prevents you from going back and forth and smudging your lines.
Final Thoughts
Painter Bob Ross once said, “We don’t make mistakes, just happy little accidents.” If you’re getting the results you want with the current technique you’re using, that’s totally fine. There’s really no wrong or right way to do art, after all.
However, if you feel like you’re not achieving the look you want or are trying to execute a certain style, then we hope that this guide helped you avoid common boo-boos when doing adult coloring books.
So, which of these tips are you eager to try out first? Let us know by dropping a comment below!
Share this post
4 comments


Great tips! TFS!
I have been afraid to color with glitter markers given to me by a friend. After watching your tutorial video I am now excited to give it a go. Thank you for this video and also the others. I have dealt with finger/hand fatigue . I love using colored pencils but not always happy with the results. Tutorial helped there also!!
I’ve found it easier to start my projects in the middle of the page. I also use a sheet of plain white paper across the page to rest my hand on as I work. This stops skin oils from getting on the page and as I work out it prevents me from accidentally rubbing areas I’ve already colored.
I found the best way to remember which color goes where, is to lightly write on the back of my coloring page the number of the gel pen/brand (C 000 for Color it pens, GW/GN/GM for Gel Writer pens, etc.) & color name of colored pencil (I have coded & numbered my colored pencils for easy identification(CY for Crayola, CZ for CraZart, etc). I have also used white-out on the tops of the caps of my gel pens for the Color-it pens, then when dry, use a sharpie fine point to write the number for easy selection.